Developer Guide
Welcome to Socius Developer Guide!
Welcome to Socius Developer Guide! Choose a section from the table of contents below to find the details on how Socius works!
Table of Contents
Introduction to Socius
Socius is a desktop application that helps CS2103T Software Engineering students, to
- manage classmates’ contacts,
- make friends, and
- find teammates!
The Socius Developer Guide gets you learn how Socius works. This Developer Guide familarises you with the commands and functionality of Socius, enabling you to build on Socius.
We hope that you will have a great time learning about Socius! :)
Socius provides these main features:
- Access details of students taking CS2103T.
- Find any student with their name, tutorial group, nationality, tags, and more.
- Pin suitable tags to categorize students.
- View statistics on nationality.
Socius is optimized for use via a Command Line Interface (CLI) while still having the benefits of a Graphical User Interface (GUI). If you can type fast, Socius can get your contact management tasks done faster than traditional GUI apps.
Using this guide
Before exploring the features of Socius, you should be familiar with these symbols used in this user guide.
| Symbol | Meaning |
|---|---|
| Important information | |
| Warning or caution | |
| Additional information such as tips | |
| Help with common technical issues |
Acknowledgements
Socius is adapted from Address Book 3, authored by NUS CS2103T Teaching Team. Address Book 3 Source Code
Setting up & Getting started
Refer to the guide Setting up & Getting started.
Design
.puml files used to create diagrams in this document can be found in
the diagrams folder. Refer to the PlantUML
Tutorial at se-edu/guides to learn how to create and edit
diagrams.
Architecture
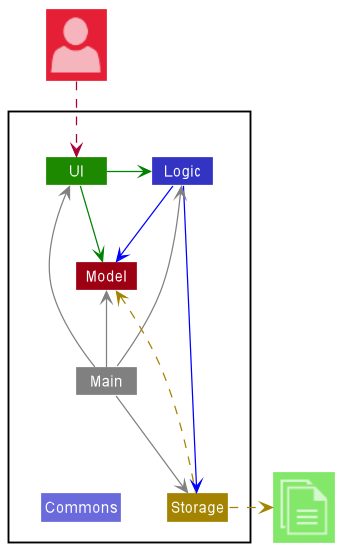
The Architecture Diagram given above explains the high-level design of Socius.
Given below is a quick overview of main components and how they interact with each other.
Main components of the architecture
Main has two classes
called Main
and MainApp. It
is responsible for,
- At Socius launch: Initializes the components in the correct sequence, and connects them up with each other.
- At shut down: Shuts down the components and invokes cleanup methods where necessary.
Commons represents a collection of classes used by multiple other components.
The rest of the App consists of four components.
-
UI: The UI of Socius. -
Logic: The command executor. -
Model: Holds the data of Socius in memory. -
Storage: Reads data from, and writes data to, the hard disk.
How the architecture components interact with each other
The Sequence Diagram below shows how the components interact with each other for the scenario where the user issues
the command delete 1.
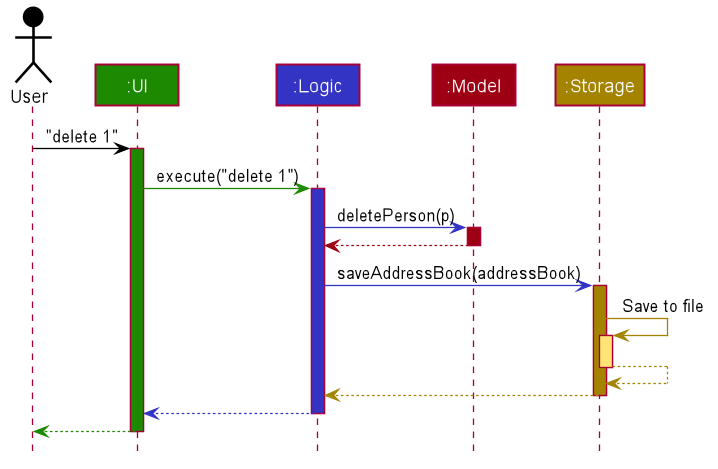
Each of the four main components (also shown in the diagram above),
- defines its API in an
interfacewith the same name as the Component. - implements its functionality using a concrete
{Component Name}Managerclass (which follows the corresponding APIinterfacementioned in the previous point.
For example, the Logic component defines its API in the Logic.java interface and implements its functionality using
the LogicManager.java class which follows the Logic interface. Other components interact with a given component
through its interface rather than the concrete class (reason: to prevent outside component’s being coupled to the
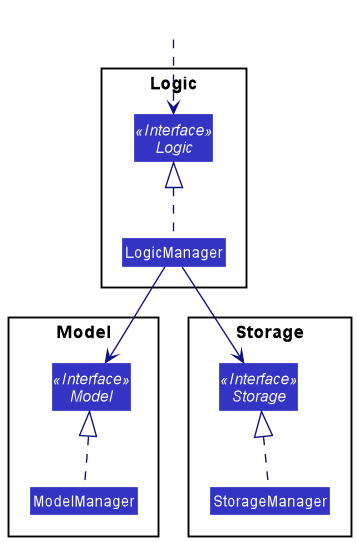
implementation of a component), as illustrated in the (partial) class diagram below.
The sections below give more details of each component.
UI component
The API of this component is specified
in Ui.java

The UI consists of a MainWindow that is made up of parts e.g.CommandBox, ResultDisplay, PersonListPanel
, StatusBarFooter etc. All these, including the MainWindow, inherit from the abstract UiPart class which captures
the commonalities between classes that represent parts of the visible GUI.
The UI component uses the JavaFx UI framework. The layout of these UI parts are defined in matching .fxml files that
are in the src/main/resources/view folder. For example, the layout of
the MainWindow
is specified
in MainWindow.fxml
The UI component,
- executes user commands using the
Logiccomponent. - listens for changes to
Modeldata so that the UI can be updated with the modified data. - keeps a reference to the
Logiccomponent, because theUIrelies on theLogicto execute commands. - depends on some classes in the
Modelcomponent, as it displaysPersonobject residing in theModel.
Logic component

API : Logic.java
How the Logic component works:
- When
Logicis called upon to execute a command, it uses theAddressBookParserclass to parse the user command. - This results in a
Commandobject (more precisely, an object of one of its subclasses e.g.,AddCommand) which is executed by theLogicManager. - The command can communicate with the
Modelwhen it is executed (e.g. to add a person). - The result of the command execution is encapsulated as a
CommandResultobject which is returned back fromLogic.
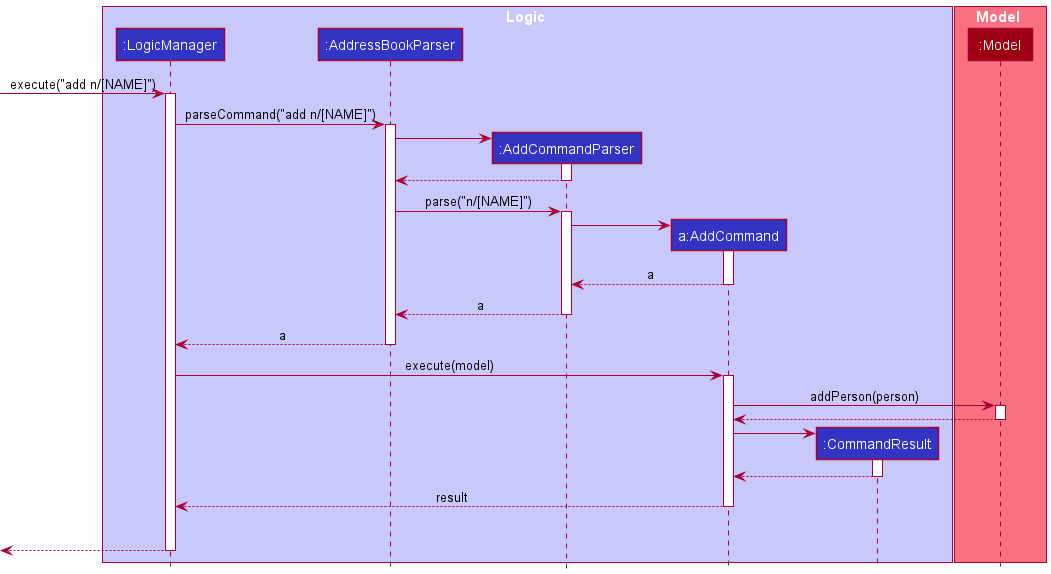
The Sequence Diagram below illustrates the interactions within the Logic component for the execute("edit 1 n/Amy") API
call.
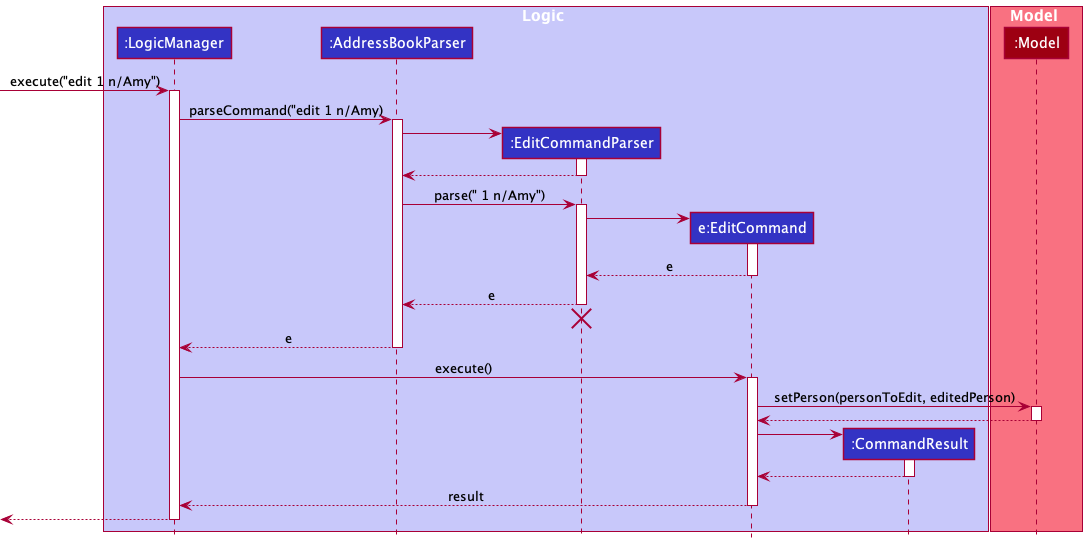
EditCommandParser should end at the destroy marker (X) but due to a limitation of PlantUML, the lifeline reaches the end of diagram.
Model component
API : Model.java
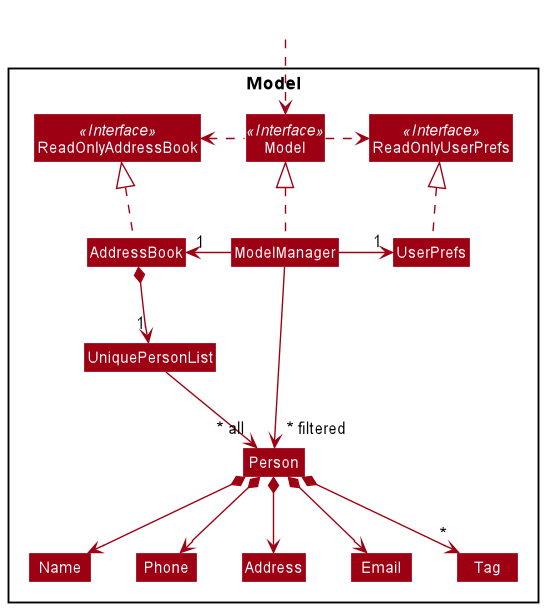
The Model component,
- stores the address book data i.e., all
Personobjects (which are contained in aUniquePersonListobject). - stores the currently ‘selected’
Personobjects (e.g., results of a search query) as a separate filtered list which is exposed to outsiders as an unmodifiableObservableList<Person>that can be ‘observed’ e.g. the UI can be bound to this list so that the UI automatically updates when the data in the list change. - stores a
UserPrefobject that represents the user’s preferences. This is exposed to the outside as aReadOnlyUserPrefobjects. - does not depend on any of the other three components (as the
Modelrepresents data entities of the domain, they should make sense on their own without depending on other components)
Tag list in the AddressBook, which Person references. This allows AddressBook to only require one Tag object per unique tag, instead of each Person needing their own Tag objects.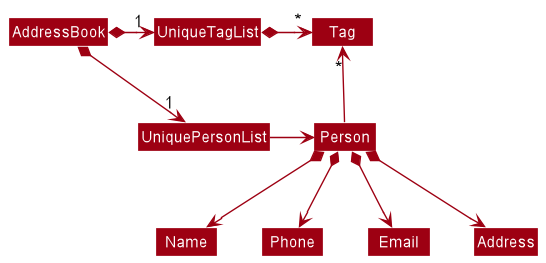
Storage component
API : Storage.java
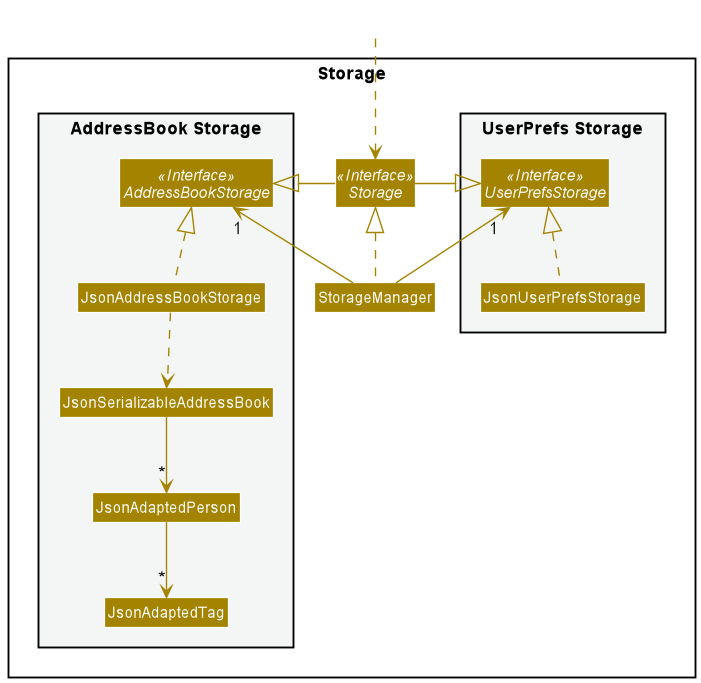
The Storage component,
- can save both address book data and user preference data in json format, and read them back into corresponding objects.
- inherits from both
AddressBookStorageandUserPrefStorage, which means it can be treated as either one (if only the functionality of only one is needed). - depends on some classes in the
Modelcomponent (because theStoragecomponent’s job is to save/retrieve objects that belong to theModel)
Common classes
Classes used by multiple components are in the seedu.addressbook.commons package.
Implementation of Features
This section describes some noteworthy details on how certain features are implemented.
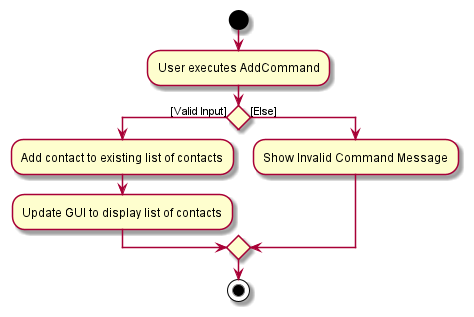
Adding a person add
Implementation
The add mechanism is facilitated by AddCommand and AddCommandParser. It allows users to add contacts by name alone, without the need to include other contact details.
Usage
Given below is an example usage scenario of how the AddCommand mechanism behaves at each step.
Step 1. The user first launches Socius and adds a new contact by name, without any other contact details.
Step 2. The user executes the command “add n/[NAME]” to add a new person with no contact details.
Step 3. The parse function of AddCommandParser will parse the input and set the optional arguments as empty strings, before
instantiating a new Person object.
Step 4. The command communicates with the Model to add the person to the existing AddressBook.
Step 5. The result of the command execution is encapsulated as a CommandResult object which is returned back from Logic.
The following sequence diagram shows how the AddCommand function works:
The following activity diagram summarizes what happens when a user executes an AddCommand:
Design Considerations
Aspect: How contacts are saved with optional arguments:
-
Alternative 1 (current choice): Save a contact, with empty strings as arguments if argument is not included in
input.
- Pros: Easy to implement.
- Cons: May result in unexpected bugs.
-
Alternative 2: Save all optional attributes of a contact as Optional type.
- Pros: Will result in fewer unexpected bugs since input is expected to be optional.
- Cons: Harder to implement.
Adding tags to people addt
Implementation
The add tag mechanism is facilitated by AddTagCommand and AddTagCommandParser. It allows users to add tags to a person in their contact list by specifying the person’s index number and the tags to add.
Usage
Given below is an example usage scenario and how the remark mechanism behaves at each step.
Step 1. The user executes addt 1 t/friend command to add the ‘friend’ tag to the first person in the displayed contact list.
Step 1.1. Alternatively, the user may execute addt all t/friend command to add the ‘friend’ tag to everybody in the displayed
contact list.
Step 2. AddTagCommandParser#parse will then parse the arguments provided. A new AddTagCommand object will be created after parsing.
The following sequence diagram briefly shows how the AddTagCommandParser operation works:
Step 3. The AddTagCommand will then create a new Person using information from input tag. All other information will be taken from the original Person.
Step 4. AddTagCommand#execute will then replace the original Person in the model with the new Person.
The following sequence diagram shows how the AddTagCommand mechanism works:
Design Considerations
Aspect: How to support adding tags for one person and for everyone within AddTagCommand:
-
Alternative 1 (current choice): When the user enters ‘addt all…’, the parser will take Index as null.
- Pros: Easy to implement.
- Cons: May result in unexpected bugs.
-
Alternative 2: Create two different classes for each function.
- Pros: Will result in fewer unexpected bugs since the logic is more straightforward to the developer.
- Cons: Less user-friendly as multiple commands have very similar functionalities.
Editing a person edit
Implementation
The edit mechanism is facilitated by EditCommand and EditCommandParser. It allows users to edit any contact details of a person in their contact list by the index number shown in their displayed contact list.
The following activity diagram summarizes what happens when a user executes a edit command on a specified person:
The edit mechanism will edit any contact details of the person specified by a given index. If the edited person already exists, the edit command will throw an exception.
During EditCommand#execute, a new Person object will be created. The values will remain the same for all of a person contact details (e.g. Name) except for those which are specified for change.
Usage
Given below is an example usage scenario and how the edit mechanism behaves at each step.
Step 1. The user executes edit 1 n/Alice command to edit the name of first person in the displayed contact list to ‘Alice’.
Step 2. EditCommandParser#parse will then parse the arguments provided. A new EditCommand object will be created after parsing.
The following sequence diagram briefly shows how the EditCommandParser operation works:
Step 3. The EditCommand will then create a new Person using information from input arguments. All other information will be taken from the original Person.
Step 4. EditCommand#execute will then replace the original Person in the model with the new Person.
The following sequence diagram shows how the EditCommand mechanism works:
Design Considerations
-
Alternative 1 (current choice): Create a new
Personwith their contact details replaced and the other contact details same as the originalPerson.- Pros: Maintains immutability.
- Cons: It may have performance issues in terms of memory usage as a new
Personobject is created.
-
Alternative 2: Edit the original
Persondirectly.- Pros: It uses less memory and thus may run faster.
- Cons: If the execution is stopped halfway, then the newly updated person will contain wrong information. It will also be difficult to debug.
Support for multiple social handles
Implementation
A social handle can store a social platform and a user ID tied to that platform.
As a person may have multiple social handles for different social platforms, there is a need to support multiple social handles tied to a person.
The approach to implementing multiple social handles is similar to the original AB3’s approach to implementing multiple tags. A Java HashSet is used to store all the social handle objects of a person.
The current implementation allows for each person to have only 1 social handle for each platform. Therefore, when parsing social handles, new user ID will overwrite old user ID of the same social platform. This is done by using a Java Hashtable to store all the original social platforms in a platform name to social handle object pair, then check if the social platform of new social handle is present in the hashtable, and then update accordingly. After all the updates, the values of the hashtable are converted into a set to be store under an attribute of a person.
Usage
Social handles can be introduced to a person via the ‘add’ or ‘edit’ command.
Given a user wants to change the following entry:
Given below demonstrates how the social handle mechanism would behave at each step.
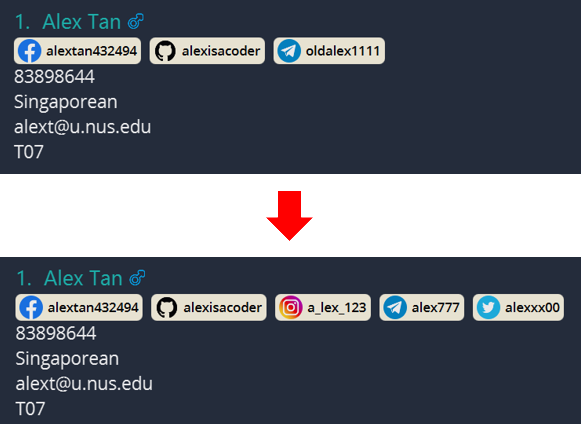
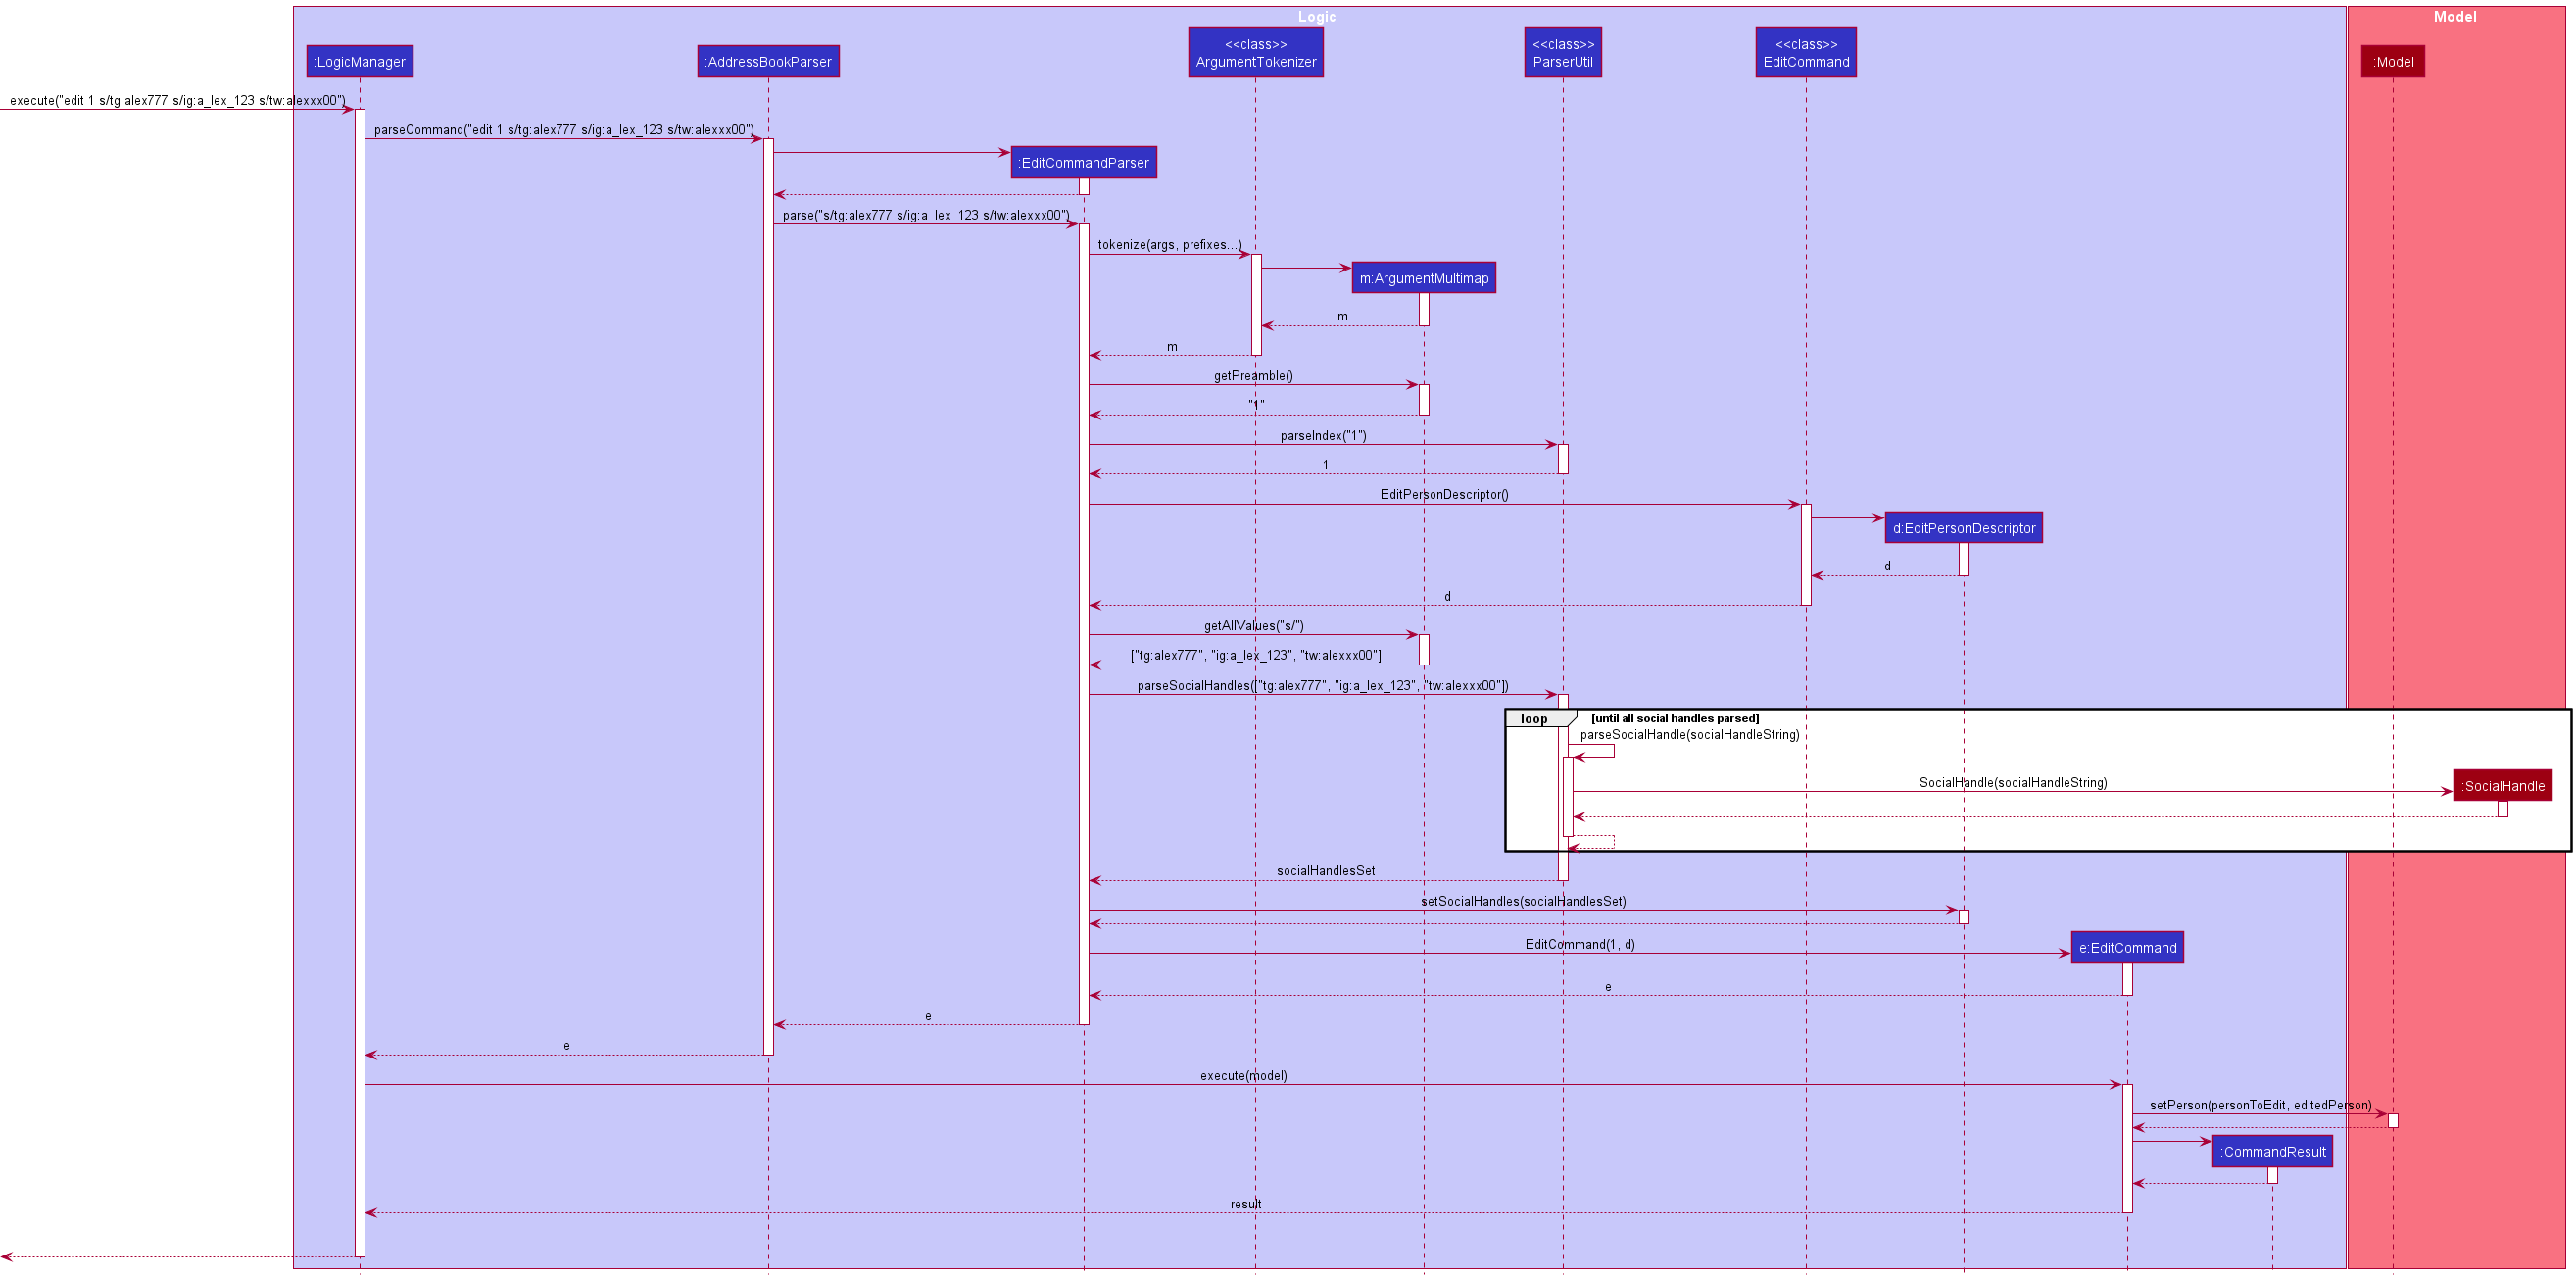
Step 1: The user enters the command edit 1 s/tg:alex777 s/ig:a_lex_123 s/tw:alexxx00
Step 2: AddressBookParser#parseCommand will be called to do the first round of parsing to find the type of command being used.
Step 3: After finding the command used is Edit, EditCommandParser#parse will be called to further parse the command.
Step 4: EditCommandParser#parse will call ArgumentTokenizer#tokenize to get an ArgumentMultimap object, which contains parsed values of all the prefixes.
Step 5: ArgumentMultimap#GetAllValues is then called to get a list of values with social handle prefix s/.
Step 6: ParserUtil#parseSocialHandles is then used to parse the string value of social handles into a set of SocialHandle objects.
Step 7: EditCommand object is then created and updated with all the change needed to a person.
Step 8: LogicManager will then execute the EditCommand
Step 9: This will update the relevant person with the new data
The following sequence diagram shows how the EditCommand function works for social handles:
Design Considerations
Aspect: How to store social handle
-
Alternative 1: Store each social handle for each platform as an individual attribute of a person
- Pros: The logic will be easier to test.
- Cons: There will be many duplicated code as each social handles are similar.
-
Alternative 2 (Current): Store a person’s social handles as a set.
- Pros: It will be neater and less time-consuming to implement. Supporting additional platforms will only requires little code change.
- Cons: It may be more complicated to test.
Deleting a person delete
Implementation
The delete mechanism is facilitated by DeleteCommand and DeleteCommandParser. It allows users to delete a person in their contact list by the index number shown in their displayed contact list.
Usage
Given below is an example usage scenario of how the DeleteCommand mechanism behaves at each step.
Step 1. The user executes delete 1 command to delete the first person in the displayed contact list from the displayed contact list.
Step 2. DeleteCommandParser#parse will then parse the index provided. A new DeleteCommand object will be created after parsing.
Step 4. The command communicates with the Model to delete the person from the existing AddressBook.
Step 5. The result of the command execution is encapsulated as a CommandResult object which is returned from Logic.
The following sequence diagram shows how the DeleteCommand function works:
The following activity diagram summarizes what happens when a user executes an DeleteCommand:
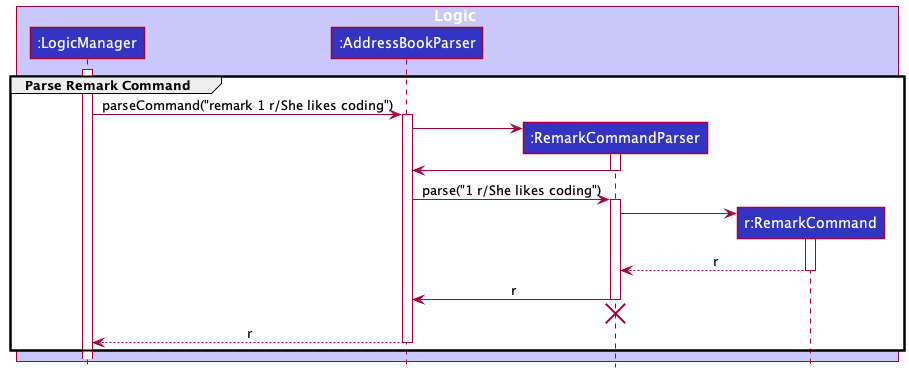
Adding a remark to people remark
Implementation
The remark mechanism is facilitated by RemarkCommand and RemarkCommandParser. It allows users to add a remark to a person in their contact list by the index number shown in their displayed contact list.
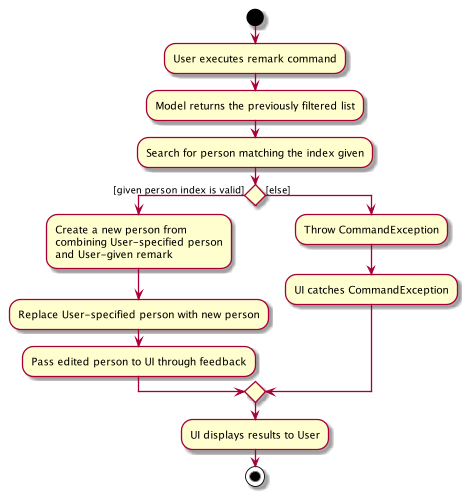
The following activity diagram summarizes what happens when a user executes a remark command on a specified person:
The remark mechanism will add a remark to a person specified by a given index. If a remark already exists, the new remark will overwrite the old remark.
During RemarkCommand#execute, a new Person object will be created. The values will remain the same for all of a person contact details (e.g. Name) except for Remark.
Usage
Given below is an example usage scenario and how the remark mechanism behaves at each step.
Step 1. The user executes remark 1 r/She likes coding command to add a remark to the first person in the displayed contact list.
Step 2. RemarkCommandParser#parse will then parse the arguments provided. A new RemarkCommand object will be created after parsing.
The following sequence diagram briefly shows how the RemarkCommandParser operation works:
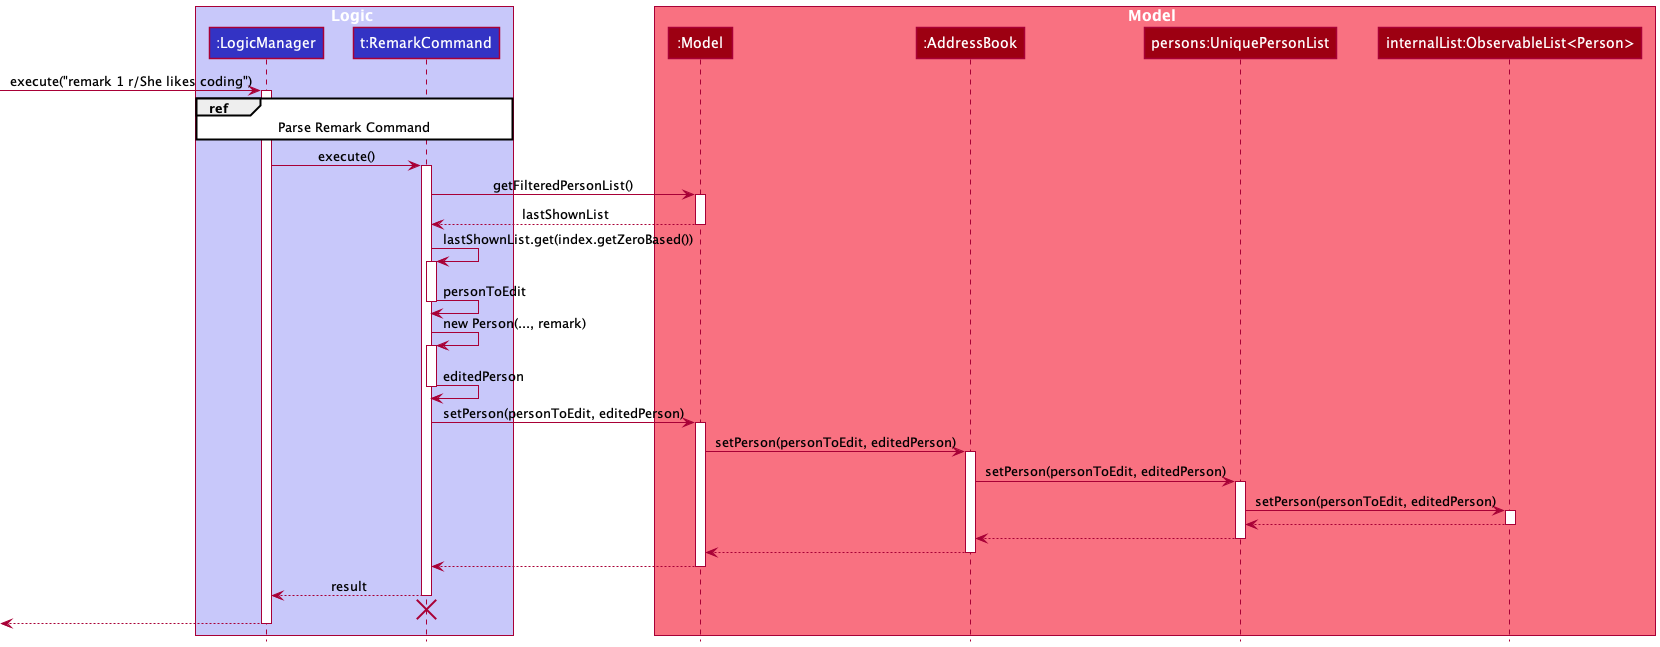
Step 3. The RemarkCommand will then create a new Person using information from input remark. All other information will be taken from the original Person.
Step 4. RemarkCommand#execute will then replace the original Person in the model with the new Person.
The following sequence diagram shows how the RemarkCommand mechanism works:
Design Considerations
-
Alternative 1 (current choice): Create a new
Personwith their remark replaced and the other contact details same as the originalPerson.- Pros: Maintains immutability.
- Cons: It may have performance issues in terms of memory usage as a new
Personobject is created.
-
Alternative 2: Edit the original
Persondirectly.- Pros: It uses less memory and thus may run faster.
- Cons: If the execution is stopped halfway, then the newly updated person will contain wrong information. It will also be difficult to debug.
Delete multiple people deletem
Implementation
The delete multiple people mechanism will delete contacts specified by a given set of keywords. Any contacts containing all the specified keywords will be deleted.
It works by filtering for the contacts in the model and deleting them one by one.
Usage
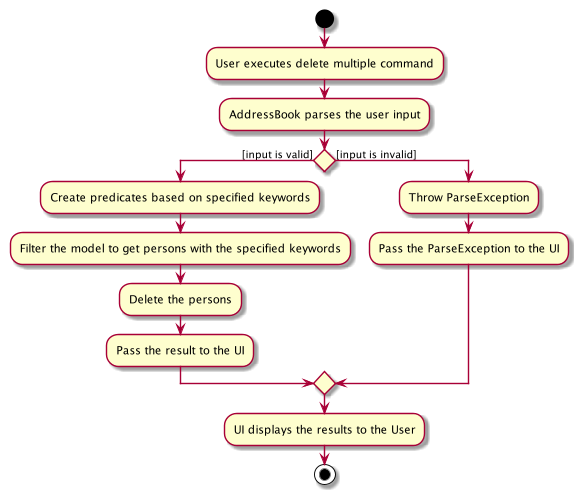
The following activity diagram briefly summarizes what happens when a user executes the DeleteMultipleCommand to delete contacts by keywords:
Given below is an example usage scenario and how the deleting multiple person mechanism behaves at each step.
Step 1. The user launches the application.
Step 2. The user executes deletem t/friends g/m command to delete all contacts with the tag friends and gender M.
Step 3. This will call DeleteMultipleCommandParser#parse which will then parse the arguments provided.
Within DeleteMultipleCommandParser#parse, TagContainsKeywordsPredicate and GenderContainsKeywordsPredicate will be created using the tags and gender. These will then be added into the list of predicates.
Step 4. A new DeleteMultipleCommand object will be created with its predicate set to the one defined in the previous step.
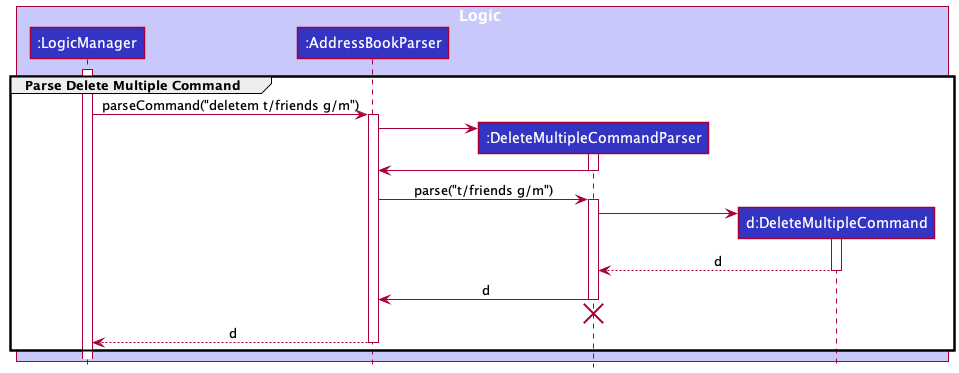
The following sequence diagram briefly shows how the parser operation works (MultiplePredicates not shown):
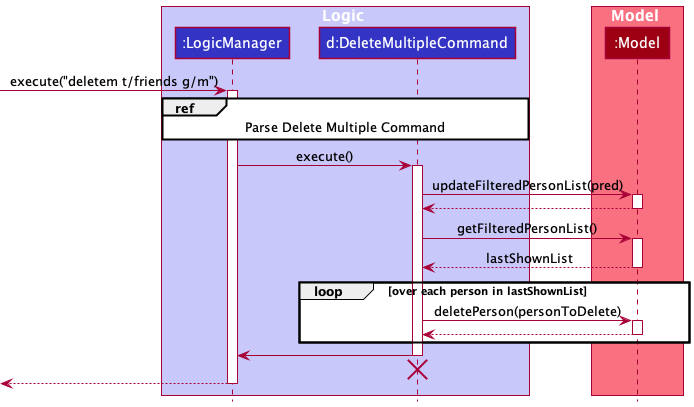
Step 5. DeleteMultipleCommand#execute will filter the model with the provided list of predicates and get back the filtered list.
Step 6. It will then iterate through the list and call deletePerson to remove contact with matching keywords one by one.
Step 7. After deleting contacts, it will call updateFilteredPersonList on model to list all the remaining contacts.
The following sequence diagram shows how the deleting multiple person mechanism works:
Design Considerations
-
Alternative 1 (current choice): Deletes multiple contacts from the list given multiple keywords.
- Pros: Convenient for user to mass delete contacts with one command instead of removing one by one.
- Cons: Challenging to implement as it requires parsing and checking multiple dynamic parameters. It also may have performance issues in terms of memory usage.
-
Alternative 2: Deletes multiple contacts from the list given a single keyword.
- Pros: Less overlapping and easier to debug. It also uses less memory and thus may run faster.
- Cons: Reduced flexibility for users when deleting contacts as they can only input one single keyword.
Delete tags from people deletet
Implementation
The delete tag mechanism is facilitated by DeleteTagCommand and DeleteTagCommandParser. It allows users to delete tags from a person in their contact list by specifying the person’s index number and the tags to add.
Usage
Given below is an example usage scenario and how the delete tag mechanism behaves at each step.
Step 1. The user executes deletet 1 t/friend command to delete the ‘friend’ tag from the first person in the displayed contact list.
If the person does not has the ‘friend’ tag, the DeleteTagCommand throws an exception.
Step 1.1. Alternatively, the user may execute deletet all t/friend command to delete the ‘friend’ tag from everyone in the displayed
contact list. If no one has the ‘friend’ tag, the DeleteTagCommand throws an exception.
Step 2. DeleteTagCommandParser#parse will then parse the arguments provided. A new DeleteTagCommand object will be created after parsing.
The following sequence diagram briefly shows how the DeleteTagCommandParser operation works:
Step 3. The command communicates with the Model to delete the person from the existing AddressBook.
Step 4. The result of the command execution is encapsulated as a CommandResult object which is returned from Logic.
The following sequence diagram shows how the DeleteTagCommand mechanism works:
Design Considerations
Aspect: How to support adding tags for one person and for everyone within AddTagCommand:
-
Alternative 1 (current choice): The
deletet allcommand should fail only if no one has the specified tag to delete.- Pros: Intuitive.
- Cons: May result in unintentional deletion of tags for the careless user.
-
Alternative 2: The
deletet allcommand should pass only if everyone has the specified tag to delete.- Pros: Minimise unintentional deletion of tags.
- Cons: Less user-friendly, since the user have to make sure all users that are considered must carry that tag to delete.
Sorting people sort
Implementation
The following activity diagram summarizes what happens when a user executes a sort persons command with a specified field:
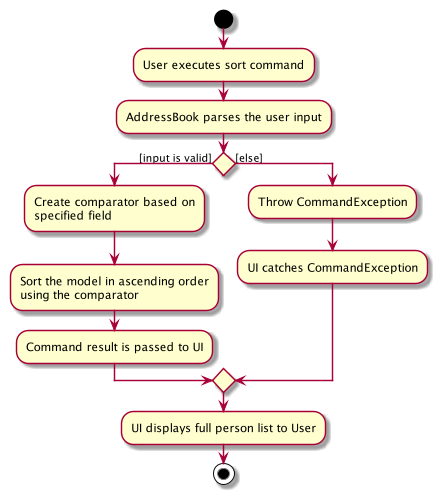
The sort mechanism sorts persons based on the specified field in ascending order.
The command will result in the creation of a Comparator
Usage
Given below is an example usage scenario and how the Find mechanism behaves at each step.
Step 1. The user launches the application.
Step 2. The user executes sort n/ command to sort all persons by name in ascending alphabetical order.
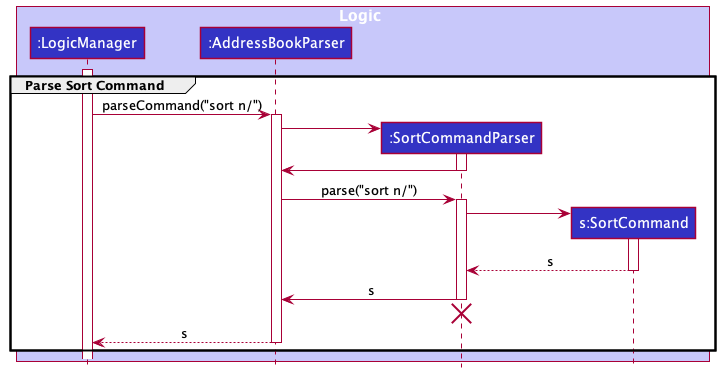
Step 3. This will call SortCommandParser#parse which will then parse the arguments provided.
Step 4. A new NameComparator and SortCommand object will then be created. It will be used to sort all the persons based on their names. This NameComparator is then passed to the SortCommand.
The following sequence diagram shows how the parser operation works (NameComparator not shown):
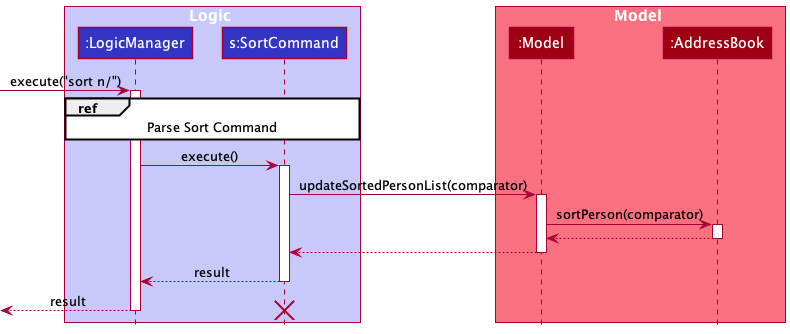
Step 5. SortCommand#execute will set the AddressBook model’s sorted person list with the provided comparator.
Step 6. The GUI will then proceed to get the full list of persons.
Step 7. After execution, CommandResult will contain a message indicating that it has sorted all persons based on the specified field.
The following sequence diagram shows how the sort mechanism works:
Design Considerations
-
Alternative 1 (current choice): Sort all persons based on single field.
- Pros: Easy to implement.
- Cons: May not be very convenient if the contact list is very huge and users would like to sort based on multiple fields.
-
Alternative 2: Sort all persons based on multiple fields.
- Pros: Convenient if the contact list is very huge and users would like to sort based on multiple fields.
- Cons: Difficult to implement.
Viewing statistics stat
Implementation
The Statistics command displays the nationality statistics of a given tutorial group.
Usage
Given below is an example usage scenario and how the Statistics mechanism behaves at each step.
Step 1. The user launches the application.
Step 2. The user executes stat T09 command to compute the nationality statistics of tutorial group T09.
Step 3. This will call StatisticsCommandParser#parse which will then parse the arguments provided.
Step 4. A new TutorialGroup and StatisticsCommand object will then be created. It will be used to compute the statistics of the particular TutorialGroup. This TutorialGroup is then passed to the StatisticsCommand.
The following sequence diagram shows how the parser operation works (NameComparator not shown):
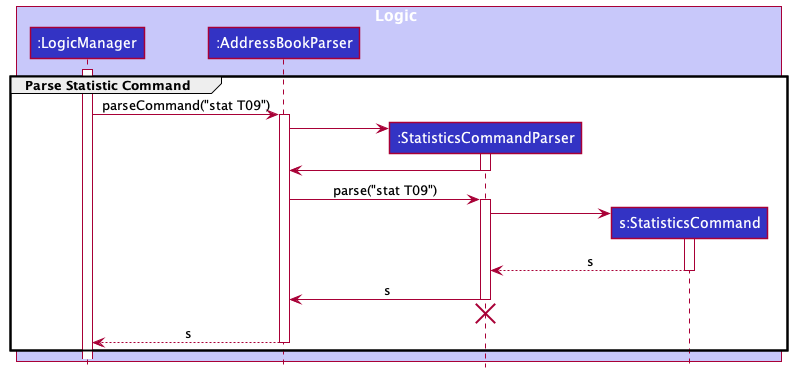
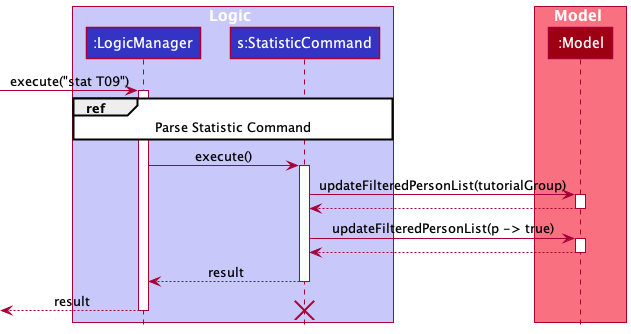
Step 5. StatisticsCommand#execute will set the AddressBook model’s filtered person list with the filter criteria being the tutorial group. It will then be extracted into a List and then the AddressBook model’s list will be reset.
Step 6. A Statistic object will then be created and its raw data will be passed to the returned CommandResult.
Step 7. The GUI will then proceed to parse the raw data and display it as a pie chart to the user.
The following sequence diagram shows how the Statistic mechanism works:
Importing contacts import
Implementation
The import JSON file will import an external addressbook and add all the entries to the current addressbook in the user’s device.
It works by utilizing the same mechanism that is used by Socius when first initializing the addressbook with existing JSON data.
Usage
Given below is an example usage scenario and how the Import mechanism behaves at each step.
Step 1. The user launches the application.
Step 2. The user executes import t35.json command to import a file located in data/t35.json.
Step 3. This will call ImportCommandParser#parse which will then parse the argument provided.
Step 4. A new ImportCommand object will be created with its importedFileName set to the one parsed in the previous step.
Step 5. ImportCommand#execute will create a mock Storage that takes in a mock AddressBookStorage with the filePath set to data/importedFileName.
Step 6. It will then call Model#importAddressBook which will take in the imported ReadOnlyAddressBook returned from Storage#readAddressBook.
Step 7. Finally, it will return a CommandResult if the operation is successful.
Design Considerations
Aspect: File directory:
-
Alternative 1 (current choice): Only allow to-be-imported files to be located in the
datadirectory- Pros: Every file used in the application will live under a single
datadirectory. - Cons: Less flexibility for the user.
- Pros: Every file used in the application will live under a single
-
Alternative 2: Allow to-be-imported files to be located anywhere
- Pros: Gives user the flexibility to put the file wherever they want.
- Cons: Different OSes have different file paths convention.
Exporting contacts export
Implementation
The export JSON file will export all the current data into a JSON file.
It works by utilizing the same mechanism that is used by Socius when saving the addressbook into a JSON file.
Usage
Given below is an example usage scenario and how the Export mechanism behaves at each step.
Step 1. The user launches the application.
Step 2. The user executes export tmp.json command to export a file located in data/tmp.json.
Step 3. This will call ExportCommandParser#parse which will then parse the argument provided.
Step 4. A new ExportCommand object will be created with its outputFilePath set to data/FILE_NAME,
with the FILE_NAME being the string parsed in the previous step.
Step 5. ExportCommand#execute will first call FileUtil#createIfMissing to create the file as specified in outputFilePath.
Step 6. It will then call JsonUtil#saveJsonFile which will take in the outputFilePath and a JsonSerializableAddressBook of the current data, which is retrieved by calling model#getAddressBook().
Step 7. Finally, it will return a CommandResult if the operation is successful.
Design Considerations
Aspect: File directory:
-
Alternative 1 (current choice): Only allow files to be exported to the
datadirectory- Pros: Every file exported from the application will live under a single
datadirectory. - Cons: Less flexibility for the user.
- Pros: Every file exported from the application will live under a single
-
Alternative 2: Allow users to export files to any directory
- Pros: Gives user the flexibility to place the file wherever they want.
- Cons: Different OSes have different file paths convention.
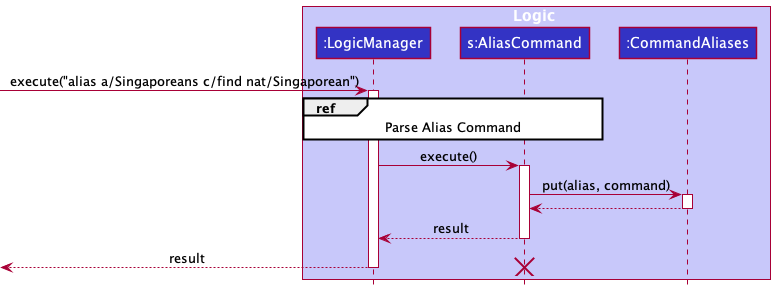
Aliasing commands alias
Implementation
The aliasing mechanism will give an alias to the specified command. If an alias already exists, the new command being aliased will overwrite the old one.
During AliasCommand#execute, a new entry of alias-command pair will be put into a singleton class called CommandAliases, which is implemented using a HashMap.
Usage
Given below is an example usage scenario and how the alias mechanism behaves at each step.
Step 1. The user executes alias a/Singaporeans c/find nat/Singaporean command to assign the alias Singaporeans to the command find nat/Singaporean.
Step 2. AliasCommandParser#parse will then parse the arguments provided. Then a new AliasCommand object will be created after parsing.
The following sequence diagram briefly shows how the alias operation works:
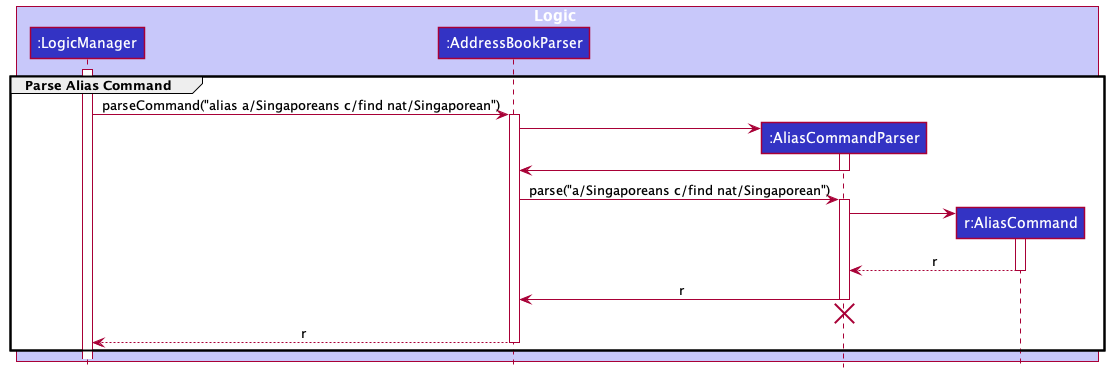
Step 3. AliasCommand#execute will then add a new entry of alias-command pair into CommandAliases by calling CommandAliases#put.
The following sequence diagram shows how the alias command mechanism works:
Design Considerations
-
Alternative 1 (current choice): Singleton pattern
- Pros: Cannot be instantiated multiple times.
- Cons: Might be confusing for new developers.
-
Alternative 2: Non-Singleton
- Pros: More commonly used in general and thus easier to understand.
- Cons: A normal class can be instantiated multiple times, which does not suit the context of this implementation.
Saving data
Implementation
After each command, the latest data is saved in a JSON file. This helps users who wish to seamlessly continue using Socius after exiting from Socius previously.
Design Considerations
Aspect: How to safely save data from contact list to a JSON file:
-
Alternative 1 (current choice): Data is saved after every command.
- Pros: Easy to implement.
- Cons: More prone to errors since the save file is accessed very frequently and sometimese unnecessarily.
-
Alternative 2: Data is saved after every command that modifies the contact list.
- Pros: Less prone to errors since the save file is accessed only when necessary.
- Cons: Tricky to implement.
Input Suggestion
Implementation
The Input Suggestion mechanism will suggest potential words when the user types in something wrong or invalid.
Currently, this feature only supports suggestions for commands and nationalities.
This feature is implemented using the Wagner-Fischer dynamic programming algorithm to compute the Levenshtein distance.
The Levenshtein distance between two words is the minimum number of single-character edits
(insertions, deletions or substitutions) required to change one word into the other.
Usage
Given below is an example usage scenario and how the Input Suggestion mechanism behaves at each step when a user types in a wrong command word.
Step 1. The user launches the application.
Step 2. The user executes fin n/Ben command, with the intention of typing find n/Ben.
Step 3. This will call AddressBookParser#parseCommand. But since there are no command words that match it,
it will end up at the default clause of the switch statement.
Step 4. A new WordSuggestion object will be created with its word set to the commandWord,
validWords set to the COMMAND_WORDS list, and the distanceLimit set to 2.
Step 5. While being initialized, WordSuggestion#computeAllLevenshteinDistance will be called, and it will compute the
Levenshtein distance of word with every single word in validWords.
The result will be stored as a Map in editDistances,
with the key and value being a word and its corresponding edit distance respectively.
the minimum edit distance is also computed and stored in minDistance.
Step 6. Next, WordSuggestion#getSuggestedWords is called. It will return as a string, all the words that has
the same edit distance as minDistance, if minDistance is smaller than distanceLimit.
Step 7. Finally, it will throw a ParseException which contains the suggested words computed previously and
display the suggestions to the user.
Design Considerations
Aspect: Algorithm and Time Complexity:
-
Alternative 1 (current choice): Dynamic programming (Wagner-Fischer algorithm)
- Pros: More efficient, only takes
O(n * m)time, withnandmbeing the length of each of the two strings. - Cons: Harder to implement by the developers.
- Pros: More efficient, only takes
-
Alternative 2: Recursive
- Pros: Very straightforward to implement as it follows directly from its mathematical formula.
- Cons: Very inefficient as there are three recursive calls at each step, resulting in exponential time complexity.
{more aspects and alternatives to be added}
Documentation, logging, testing, configuration, dev-ops
Appendix: Requirements
Product scope
Target user profile:
- has a need to manage a significant number of contacts
- prefer desktop apps over other types
- can type fast
- prefers typing to mouse interactions
- is reasonably comfortable using CLI apps
- is an NUS student enrolled in CS2103T
- wishes to meet new friends and form CS2103T project groups
Value proposition: Socius is a simple desktop app for managing CS2103T tutorial classmates’ contacts for CS2103T module-takers, optimized for use via a Command Line Interface (CLI) while still having the benefits of a Graphical User Interface (GUI). If you can type fast, Socius can get your contact management tasks done faster than traditional GUI apps.
Socius helps you to gather information about your CS2103T tutorial classmates and facilitate the forming of project groups with them.
User stories
| Priorities: 🔴 High: Must have | 🟡 Medium: Good to have | 🟢 Low: Unlikely to have |
| Priority | As a … | I want to … | So that I can… |
|---|---|---|---|
| 🔴 High | student | scroll through each user’s entry to access information about my classmates | have a basic understanding of my classmates background |
| 🔴 High | student | add new contacts | keep track of new students |
| 🔴 High | student | delete existing contacts | delete irrelevant or outdated contacts from my address book |
| 🔴 High | student | edit existing contacts | update any outdated contacts and customise my address book |
| 🔴 High | introvert student | obtain the information of all classmates | know more about them without having to chat with all of them personally |
| 🔴 High | first time user | see all the features / commands of the application | better understand how to use it |
| 🔴 High | student | get contact information of my classmates | connect with other students and make friends |
| 🟡 Medium | visual student | see more graphics | understand the program faster |
| 🟡 Medium | unorganized student | able to organise my modules/schedule easily | keeps things on schedule so i wont lack behind |
| 🟡 Medium | impatient student | have a responsive interface | have a good user experience |
| 🟡 Medium | impatient student | customise my commands to keep them short and simple | have a better user experience |
| 🟡 Medium | tutor | track students with varying ability | better spread out students with similar ability so that the weakest wont be in the same group |
| 🟡 Medium | tutor | track students with varying background | better spread out students with similar background into different groups |
| 🟡 Medium | student | find people with different skillsets | learn from others |
| 🟡 Medium | student | view all of my contact’s social handles on a single platform | view their profile and easily contact them |
| 🟡 Medium | student | check teammates availability | make sure my teammates have same vacant timeslots as me |
| 🟡 Medium | student | know my classmates’ personalities | identify like minded people / people of certain qualities I hope to work with in the group project |
| 🟡 Medium | student | differentiate classmates from different countries | form groups with the correct international / local ratio |
| 🟡 Medium | student | identify classmates with experience | ensure the spread of people with background in different groups |
| 🟡 Medium | student | start finding teammates early | make a sound decision on who I wish to be in the same group with |
| 🟡 Medium | student | view my tutorial group’s student statistics | have a better understanding of my tutorial group’s demographics |
| 🟡 Medium | student | find classmates of the opposite gender | form groups with the correct gender ratio |
| 🟡 Medium | student | mass tag a group of contacts | shortlist them as potential groupmates |
| 🟡 Medium | international student | find other international students, possibly from the same country as me | connect with them and talk with them |
| 🟡 Medium | high CAP student | find competent team | to mantain a good cap |
| 🟡 Medium | low cap student | find people to carry | learn from them |
| 🟢 Low | fast-typer student | pipe my commands | achive greater efficiency |
Use cases
(For all use cases below, the System is the SociusApplication and the Actor is the user, unless specified
otherwise)
Use case: Add a person
MSS
- User requests to add a person in the list
- Socius adds the person
Use case ends.
Extensions
-
1a. The format of the request is invalid.
- 1a1. Socius shows an error message.
- 1a2. User enters a new request.
- Steps 1a1-1a2 are repeated until the data entered are correct.
Use case resumes at step 2.
Use case: Edit a person
MSS
- User requests to list persons
- Socius shows a list of persons
- User requests to edit the personal details of a specific person in the list
-
Socius edits the personal details of the person
Use case ends.
Extensions
-
2a. The list is empty.
Use case ends.
-
3a. The given index is invalid.
- 3a1. Socius shows an error message.
- 3a2. User enters a new request.
-
Steps 3a1-3a2 are repeated until the data entered are correct.
Use case resumes at step 4.
Use case: Delete a person
MSS
- User requests to list persons
- Socius shows a list of persons
- User requests to delete a specific person in the list
-
Socius deletes the person
Use case ends.
Extensions
-
2a. The list is empty.
Use case ends.
-
3a. The given index is invalid.
- 3a1. Socius shows an error message.
- 3a2. User enters a new request.
-
Steps 3a1-3a2 are repeated until the data entered are correct.
Use case resumes at step 4.
Use case: Display a person
MSS
- User requests to list persons
-
Socius shows a list of persons
Use case ends.
Extensions
-
2a. The list is empty.
Use case ends.
Use case: Tag a person
MSS
- User requests to list persons
- Socius shows a list of persons
- User requests to tag a specific person in the list
-
Socius tags the person
Use case ends.
Extensions
-
2a. The list is empty.
Use case ends.
- 3a. The given index is invalid.
- 3a1. Socius shows an error message.
- 3a2. User enters a new request.
-
Steps 3a1-3a2 are repeated until the data entered are correct.
Use case resumes at step 4.
- 3b. The format of the request is invalid.
- 3b1. Socius shows an error message.
- 3b2. User enters a new request.
-
Steps 3b1-3b2 are repeated until the data entered are correct.
Use case resumes at step 4.
Use case: Remove existing tag of a person
MSS
- User requests to list persons
- Socius shows a list of persons
- User requests to remove existing tag of a specific person in the list
-
Socius removes the existing tag of the person
Use case ends.
Extensions
-
2a. The list is empty.
Use case ends.
-
3a. The given index is invalid.
- 3a1. Socius shows an error message.
- 3a2. User enters a new request.
-
Steps 3a1-3a2 are repeated until the data entered are correct.
Use case resumes at step 4.
Use case: Filter persons by tag
MSS
- User requests to list persons
- Socius shows a list of persons
- User requests to filter the list of persons by tag
- Socius shows a filtered list of persons by tag Use case ends.
Extensions
-
2a. The list is empty. Use case ends.
-
3a. The given tag is invalid.
-
3a1. Socius shows an empty list.
Use case ends.
-
Use case: Add remarks for a person
MSS
- User requests to list persons.
- Socius shows a list of persons.
- User requests to add remarks for a specific person in the list.
-
Socius adds remarks for the person.
Use case ends.
Extensions
-
2a. The list is empty. Use case ends.
- 3a. The given index is invalid.
- 3a1. Socius shows an error message.
- 3a2. User enters a new request.
-
Steps 3a1-3a2 are repeated until the data entered are correct.
Use case resumes at step 4.
- 3b. The format of the request is invalid.
- 3b1. Socius shows an error message.
- 3b2. User enters a new request.
-
Steps 3b1-3b2 are repeated until the data entered are correct.
Use case resumes at step 4.
Use case: Mass tag multiple persons
MSS
- User requests to list persons.
- Socius shows a list of persons.
- User requests to tag everyone in the list.
-
Socius adds tag for the list of persons.
Use case ends.
Extensions
-
2a. The list is empty. Use case ends.
-
3a. The format of the request is invalid.
- 3a1. Socius shows an error message.
- 3a2. User enters a new request.
-
Steps 3a1-3a2 are repeated until the data entered are correct.
Use case resumes at step 4.
Use case: View tutorial group statistics
MSS
- User requests to list persons.
- Socius shows a list of persons.
- User requests to view statistics of a particular tutorial group.
-
Socius displays statistics of the tutorial group.
Use case ends.
Extensions
-
2a. The list is empty. Use case ends.
- 3a. The tutorial group does not exist.
- 3b1. Socius shows an error message.
- 3b2. User enters a new request.
-
Steps 3a1-3a2 are repeated until the data entered are correct.
Use case resumes at step 4.
- 3b. The format of the request is invalid.
- 3b1. Socius shows an error message.
- 3b2. User enters a new request.
-
Steps 3b1-3b2 are repeated until the data entered are correct.
Use case resumes at step 4.
Non-Functional Requirements
- Should work on any mainstream OS as long as it has Java
11or above installed. - Should be able to hold up to 1000 persons without a noticeable sluggishness in performance for typical usage.
- A user with above average typing speed for regular English text (i.e. not code, not system admin commands) should be able to accomplish most of the tasks faster using commands than using the mouse.
- Should follow Standardised Date format (ISO 8601).
- Should be able to work on computers with 50? MB of free storage space.
- Performance requirements: the program should respond within one second.
- Should show readable messages to users and prevent code from crashing when errors occur.
Glossary
- Mainstream OS: Windows, Linux, Unix, OS-X
- Private contact detail: A contact detail that is not meant to be shared with others
- Standardised Date Format(ISO 8601): YYYY-MM-DD. E.g. 2021-09-28
Appendix: Instructions for manual testing
Given below are instructions to test the app manually.
Launch and shutdown
-
Initial launch
-
Download the jar file and copy into an empty folder
-
Double-click the jar file Expected: Shows the GUI with a set of sample contacts. The window size may not be optimum.
-
-
Saving window preferences
-
Resize the window to an optimum size. Move the window to a different location. Close the window.
-
Re-launch the app by double-clicking the jar file.
Expected: The most recent window size and location is retained.
-
-
Shutdown
- Exit the application using the
exitcommand.
- Exit the application using the
Deleting a person
-
Deleting a person while all persons are being shown
-
Prerequisites: List all persons using the
listcommand. Multiple persons in the list. -
Test case:
delete 1
Expected: First contact is deleted from the list. Details of the deleted contact shown in the status message. Timestamp in the status bar is updated. -
Test case:
delete 0
Expected: No person is deleted. Error details shown in the status message. Status bar remains the same. -
Other incorrect delete commands to try:
delete,delete x,...(where x is larger than the list size)
Expected: Similar to previous.
-
Adding a person
-
Adding a person
-
Prerequisites: -
-
Test case:
add n/Jon Snow p/98765432 g/M t/North
Expected: New person Jon Snow, along with parameters parsed, is added to the list. Details of the added contact shown in the status message. -
Test case:
add r/King of the North e/snowyjon@gmail.com
Expected: No person is added. Error details shown in the status message. -
Other incorrect delete commands to try:
add
Expected: Similar to previous.
-
Saving data
-
Dealing with missing data files
-
Prerequisites: Ensure that you have a
datafolder containing a file titledaddressbook.jsonin the same directory as your jar file. -
Simulate a missing file by deleting the
addressbook.jsonfile. -
Re-Launch the application again. Expected: Shows the GUI with a set of sample contacts and new file titled
addressbook.jsonwill be created in thedatafolder.
-
-
Dealing with corrupted data files
-
Prerequisites: Ensure that you have a
datafolder containing a file titledaddressbook.jsonin the same directory as your jar file. -
Simulate a corrupted file by editing the
addressbook.jsonfile. -
Re-Launch the application again. Expected: Shows the GUI with a set of sample contacts and upon shutdown, the
addressbook.jsonfile will be updated with the sample contacts.
-